Hey Crafters!

The Letter C was created by gluing torn pieces of tissue paper to the printed letter C, then once dry cutting it out. Imani did NOT like the sticky feeling of the glue, so be prepared for that!
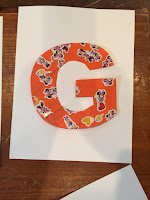
The Letter G, Imani added stickers, then I cut it out. Tip: if your little one is like Imani, peel the sticker back a little to give some help.
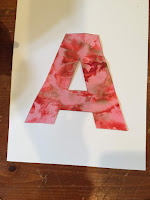
The Letter A, was finger painting.
The Letter D was done by dipping a toilet paper tube into various colors of paint and using it as a stamp/paintbrush.
Lastly, the Letter E was done using some Washable Glitter Paint Dotters. (Not sure where I got them from, sorry!)
I think they are all coming out so cute! The finished alphabet can be laminated, and bound into a book, or put into picture frames and hung on the wall in their room.
What do you think Crafters? Does this craft straddle the Product vs. Process gap? I think so!
Side NOTE! I'm also in the process of writing an ebook with TONS of fun craft and learning activities that I have tried with Imani. Let me know in the comments below if this is something you'd be interested in!
So, this is going to be the first Learning post. Yay, for not procrastinating the post!
As a first time mom, I find that I am constantly looking to see what other momma's have done at home with their little ones. This, I'm sure, is not going to change any time soon. But, there are some things that I know from being a preschool/daycare teacher and I just have to find a way to make them work for Imani.
I am always looking for ways to let Imani explore art materials. (I mean, duh, I'm a crafter, so of course, right) We've done a lot of crafts/art activities, and now I'm thinking that I need to share them with the world because, if there's any other momma's out there like me, you're always on the lookout for something new.
As a preschool teacher, I always found myself in the process versus product debate. As a new momma, I want something that I can keep as a memento of the fun we have! When I was in the classroom, I tried to blend the process art with the product driven crafts, and that is what this craft is: a blend of process and product. Enjoy!
Alphabet Craft
Materials:
Computer (optional)
Printer (optional)
26 Pieces of Colored and 26 Pieces of White or Black Cardstock
Art Materials (crayons, markers, washable paint dotters, torn tissue paper, finger paint, shaving cream)
Scissors
Sharpie
Directions:
- If using a computer, create an outline of all of the letters of the alphabet and Print onto colored cardstock. I used Microsoft Word, and the Word Art, and selected a font I liked. You want to go more basic, and less fancy with your font.
- If not using a computer, draw the outline of all the letters of the alphabet onto your colored card stock. (cumbersome, but doable, just thinking of the non-computer folks)
- For each letter of the alphabet select an art material, and allow the child to decorate.
- We do one letter each week. I also recommend getting books from the library to go along with each letter. Ex. "A" read a book about Alligators.
- We repeated the various art materials on other letters, really it was just whatever she was willing to work with on any given day.
- Once your letter is dry, cut it out, and paste onto your (white or black) cardstock.
- Hang as is, or laminate and then hang.
- We haven't finished our alphabet yet, but here's a bit of what we have done so far.


The Letter C was created by gluing torn pieces of tissue paper to the printed letter C, then once dry cutting it out. Imani did NOT like the sticky feeling of the glue, so be prepared for that!
The Letter G, Imani added stickers, then I cut it out. Tip: if your little one is like Imani, peel the sticker back a little to give some help.
The Letter A, was finger painting.
The Letter D was done by dipping a toilet paper tube into various colors of paint and using it as a stamp/paintbrush.


Lastly, the Letter E was done using some Washable Glitter Paint Dotters. (Not sure where I got them from, sorry!)
I think they are all coming out so cute! The finished alphabet can be laminated, and bound into a book, or put into picture frames and hung on the wall in their room.
What do you think Crafters? Does this craft straddle the Product vs. Process gap? I think so!
Side NOTE! I'm also in the process of writing an ebook with TONS of fun craft and learning activities that I have tried with Imani. Let me know in the comments below if this is something you'd be interested in!
Well, that's it for now Crafters!


